Tuesday, May 31, 2011

Another sneak

Photobucket
Here's a couple of little tiny sneaks! I cropped them out of the full size pics...guess that's why they're so small. Sorry. :/

Photobucket

Photobucket
Full size pics to come on Friday!

Monday, May 30, 2011

A Sneak...I Promise ;)

I mean, seriously...
Photobucket
...how cute is this countdown graphic?
Makes waiting until Friday a little more bearable, doesn't it?

As you well know by now, there's never a dull moment in my house, and this past week has proven it. :) Last week was the last week of school for the boys and we made a last-minute trip to Nashville over the weekend. It was fun! Quick, but fun...check out our pics herehttp://www.hatch-partyoffive.blogspot.com if you'd like. Nashville is one of my favorite places....I'm a big country music fan (I like all kinds of music, really) and Harrison and I LoVe Johnny Cash and June Carter, so this was a "mother ship" moment for us. We will go back again soon when we have more time.
And speaking of time....there hasn't been as much of it as I'd like to get my projects finished. Have a couple more to finish up today, so have no fear...there'll be something new posted each day this week.
But you're not here to read about that, are you? ;)
Here's a little sneak.
Photobucket
I know I'm biased and all, but boy is he cute. ;)
Photobucket
And another one from the same project.
More tomorrow!

Thursday, May 26, 2011

A Teacher Gift and the Rebellious Sneak

We're at day one of summer break at our house, and so far, it's fanstastic....relatively peaceful except for the occasional begging to go to the pool (it's looking like rain, but I think we're going to give it a try anyway here in a while). :)
Yesterday was the last day of school, and I just can't say enough how incredibly thankful we are for the boys' school. We LoVe it there, love their teachers....it's been amazing.

There seemed to be something extra special about Hud's class this year.....just a really sweet group of kids, one incredible teacher, and a wonderful assistant. I try to take turns with which class I spend my time with, splitting the time when I can. This year it was my turn to help with Hud's class...next year it will be time for Harrison's again.
I talked to some of the other moms and we decided it was a good idea to a little something extra to celebrate this year and give the teacher a special memory.
Photobucket
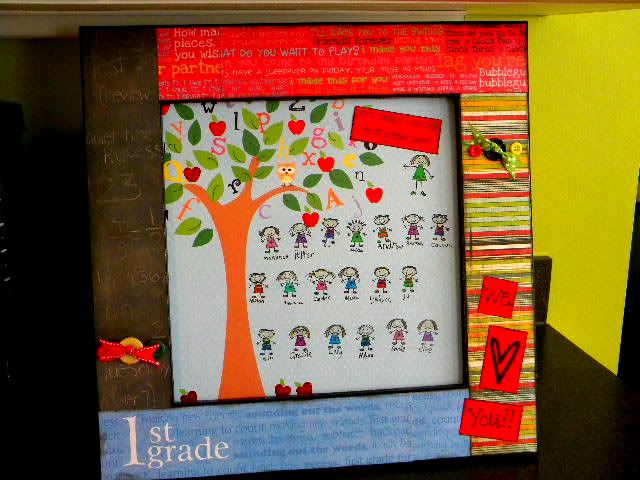
I made this frame and stamped all of the kids, and then went up to the school one day to let each of them sign under their person. It was funny listening to the talk and laugh about what they looked like. :)
Photobucket
The class presented the frame to Mrs. D yesterday....I think she liked it. :)
Photobucket
We couldn't have asked for a better teacher for Hud this year. She completely "gets" him, and has a special understanding of each of her students. Hud keeps telling me how much he's going to miss her and that he really wants her to move up to 2nd grade next year too. ;)
Me too, buddy. So ready for summer break, but sad to see this year come to an end.

Moving on....
I've had my May Front Porch Kit sitting on the kitchen table for a few days now, and I'm collecting photos and surfaces to use with it, brainstorming...getting really excited.
I'll be really busy tomorrow. :)
Photobucket
I wish I could give you a real sneak, because I have to say....I have loved each kit so far for different reasons. But this month's is definitely my favorite.
Love it BiG tImE. :)
But because I'm a rule follower (mostly) ;)....I can't really show you anything yet.
But here's a little peak in the box.

Photobucket

There...does that help? ;)

Trust me...it's awesome. Like I said, my favorite so far. You're going to love it.

REAL sneaks to come in a few days. :)

Monday, May 9, 2011

Dining Room Re-Do (and a tutorial!)

Last weekend the hubs and I finally painted the dining room...it's sat here at the entrance of our home for a year looking pretty drab and sad. ;) Don't know what took me so long, but I am LoViNg the results!
Here's the before photo:
Photobucket
And....here is the after photo! Much more fun, right? :)
Photobucket
The color is called Red Pepper by Behr at Home Depot. At first it had more of an orange tint to it than I wanted, but thankfully as it dried it was exactly what I had in mind. Whew. Reds can be a little scary.
Photobucket
The view out to our front porch.
Photobucket
I made this canvas to hang in the dining room, recycling several things in our house. I'm a thrifty girl. ;) Honestly....it saved me a trip out. :)
This really is a simple project, with the hardest part making the papers fit together. It's kind of like a puzzle, but it's not too horrible. Especially if you have plenty of extra paper to spare. You will need several different pieces of 12x12 scrapbook paper that coordinate. I love to mix paper lines, but most of these are from 7 Gypsies. Love that company, and wanted a antique/vintage feel to this canvas, and their papers are perfect for that look.
Photobucket
You will also need a canvas (paint the outside edge first), mod podge, a sponge brush, and whatever monogram letters, crosses, or anything else you would like to add to your canvas. This canvas is large (about 30"x50"), but you can use any size you would like. My large H was purchased at Joann's, and the J and B at Hobby Lobby, painted black and sprayed with polyurethane. The crosses were some extra ones laying around my house, needing a home.
Photobucket
After all of that is done, it's time to cut your papers. There is no exact science to this, just start cutting different size squares and rectangles. Of course, with the papers I chose, some of them needed to be cut to show the words, the numbers, etc...otherwise I just used random cuts. After all of your paper is cut start laying the papers out on the canvas, making sure the overlaps aren't all going the same way. After all of your paper is layed out, you can start mod podge-ing (is that a word?) the papers down. I inked the edges as I went, until all of the papers were down. I opted not to mod podge on top of the papers...you can do that if you choose.
After those were dry, I added the letters and crosses on top, using E-6000. Most amazing glue EVER.
And....you're done!